Category Archives: Kitchen Tools

Who would give a knife to their mom for Mother’s Day?

Pink Kyocera Chef Knife

By Sarah Freeman

Usually when you think of giving your mom a gift,  knives are not the first thing to come to mind. Perhaps giving one to a man in your life seems a little more fitting – some big heavy German knife any man would drool over.

Mom, on the other hand, loves to be in the kitchen but does not always need such a heavy workhorse of a knife – tiring her arm and giving her blisters while she chops, cuts and slices – unless of course, she’s doing lots of butchering or boning, which should always be done with a metal blade. Each style of knife has its time and place, but if you want to help your mom with all her OTHER everyday tasks in the kitchen, then a ceramic knife is the way to go.

A ceramic chef’s blade of equal size and shape, can be half the weight of most traditional knives. With a carefully designed smooth finish handle and  balanced blade, Mom will notice the difference from the first time you put the knife in her hands. But just wait until she puts it to the test… Kyocera says it best: “It’s when you actually try the knife that the ceramic advantage becomes real – an experience like no other.”


Black on Black Chef Knives


Even dense potatoes seem to turn to butter beneath the blade, and the same potato can be sliced paper thin with minimal pressure. Because they are so light, ceramic knives are exceptionally comfortable to use – even for lengthy, repetitive cutting tasks.  Think ‘Mom-powered tool’ for the kitchen.

The Kyocera line of ceramic knives come in several different sizes for any task in the kitchen and even more color combinations! From Santoku in Orange to Paring in Pink – they even offer a sleek black in some of the blade shapes, and white bladed chef or paring knives in any color of the rainbow.


Rainbow of Paring knives


The best part is that if anyone challenges mom’s fortitude in the kitchen and thinks she needs to use a steel knife to get the job done, she can remind them that the razor sharp ceramic blade stays sharper 15 times longer than a steel blade.

Additional advantages to a ceramic blade include that it is rust proof, impervious to acids and oil and it will never brown foods or leave a metallic taste or smell. All of which means she can even use it to cut lettuce or apples and it will not turn the lettuce brown or dull if you use it to cut acidic fruits like lemons, limes or tomatoes.


Classic Black Handled Chef Knife


So with a sharper blade, longer blade life, lighter weight and ease of cleaning – why not be that person that gets your Mom a ceramic knife this Mother’s Day?

…You can even choose a color to coordinate with her Kitchen Aid Mixer!


Matching Colors

Tagged , ,

Oatmeal Cookies get their Day

We love a good holiday, especially those involving food. And so when we found out it was Oatmeal Cookie Day (April 30th), we knew we’d better give them their proper celebration (even though we’d just partied with them last Tuesday, and the Friday before that – hey, don’t judge – they’re just that amazing) Plus, with Mother’s Day so close at hand, we decided to bring out the Queen of Oatmeal Cookies – the crisp, lacy elegance that is the Buttery Oatmeal Crisp.

IMG_3708

The first time I had one was from a Cookie Exchange Platter at Christmas time. It wasn’t like any oatmeal cookie I had ever seen (picture the pale, globby raisin filled variety from the elementary lunch line). It was thin, crispy, perfectly round and a shiny golden brown – like a mini spun caramel saucer. While elegant to look at, they are equally as nice to bite into.

IMG_3700

With A base of butter and golden sugars holding together those wafers of oatmeal you get just the right brittle crunch with plenty of texture and loads of flavor. Easily make them extra special with a simple drizzle of chocolate, sandwiched with Nutella, or by themselves as an accessory to a simple scoop of ice cream – and because they come out of the oven pliable, and cool crisp- you can even drape them over a small prep bowl or muffin tin to make a sweet and edible dessert bowl. The rim can then be dipped in white or dark chocolate and again into sprinkles or shimmer sugar.

IMG_3697

The key to the whole process is using the right tools – as seen in the video. A cookie scoop for uniformity and a Siplat for clean-ability will make all the difference in the world when it comes time to remove the cookies from the pan.

IMG_3692

Also having a nice large cooling rack allows the cookies to cool to a complete crisp on both sides. Use a small scoop for individual crisps, or jump up a size for a bowl.

IMG_3695

Anyway you serve them, Oatmeal Butter Crisps make a lovely end to any special occasion – so whether you plan to celebrate with Oatmeal Cookies everywhere – or just put this recipe in your pocket for Mother’s day – remember this delicious grown up version of a classic favorite! Either way, you should probably go ahead and start practicing now – Mom will be so proud!

IMG_3711

Buttery Oatmeal Crisps

Ingredients:

1 3/4 cup quick cooking rolled oats

3/4 cup sugar

3/4 cup flour

1/2 tsp baking powder

3/4 cup butter, melted

1/4 cup light corn syrup

1/4 cup whipping cream

1/2 cup chocolate (for topping)

ice cream to serve

Makes approximately 50 cookies

preparation:

Preheat oven to 350 degrees. Line cookie sheet with a Silpat baking mat – this makes removing the cookies simple and clean up is almost effortless. In a large bowl combine oats, sugar, flour and baking powder – set aside. In another bowl, combine melted butter, corn syrup and cream. Add butter mixture to oat mixture and stir until combined.

Drop dough by rounded teaspoons, 3 inches apart onto prepared cookie sheet. Bake 10 -12 minutes on cookie sheet and then remove to cooling rack. Drizzle with melted chocolate and serve upright with a lovely scoop of ice cream or gelato.

IMG_3688

Silpat before cookies…

IMG_3690

during…

IMG_3691

ready for the oven…

IMG_3696

and after – just the shine of the buttery goodness remains = cinchie clean up!

Tagged ,

Well, don’t you clean up nice…

By Beth Brown, Kitchen Store Specialist

There is nothing worse than a bad blender. We’ve all had them—the blenders that can’t even handle crushing a few ice cubes for a smoothie. The first thing to look for a in a ‘good’ blender is metal on metal gears, rather than the oft-found metal on plastic gears. In this, and every other category, the Vitamix 750 gets an A plus in my book!

pro-750-brushed-rglam

image courtesy of Vitamix

I use the Vitamix for smoothies, sorbets, soups, purees, hummus, nut butters, and almost anything else you could think of! The recipe book included with the Vitamix, featuring recipes from Chef Michael Votaggio—everything from a blackberry pear smoothie to red pepper walnut pesto—shows just how versatile this machine really is.

IMG_3394

Redefining ‘Smoothie’

BerrySorbet

So fresh Sorbets

IMG_0427

Literally “whip up” hummus, dips and spreads

IMG_2753

Only the ingredients you choose go into DIY Nut Butters

IMG_4486

A four tip blade, metal gearing, 2.2 HP motor and programmed ramp-up setting mean you can make scoop ready treats with one button ease!

The Vitamix 750 includes five pre-programmed settings for smoothies, frozen desserts, soups, purees, and my favorite, a self-cleaning button. Unlike a lot of products that boast “self-clean” settings, this one actually works! Even when we made super sticky peanut butter in the Vitamix, some soapy water and a whirl with the self-clean setting left us with a sparkling blender jar, ready to use for the next recipe.

panel

The question I get the most often about the Vitamix is, “Why pay $649.99 for a blender?” Well, with its versatility, full 7-year warranty, and super handy pre-programmed settings, the Vitamix 750 is an investment that I can recommend whole-heartedly.


Tagged

Adventures in Chocolate

So it’s chocolate week at Allen & Petersen, and in honor of the occasion and Mother’s Day coming up, I thought it would be ‘fun’ to make my own Passion Fruit Bon Bons! We just got all the needed supplies into the kitchen store- Belgian chocolate callets, chocolate molds, luster dust, etc. So I geared up and dove in. Please note, I am a novice. I have no experience, no training, and truthfully, no skills. In fact, I am more qualified to be a Mouseketeer than a chocolatier- and I had no idea what an adventure it was about to be! It began with the chocolate melting.

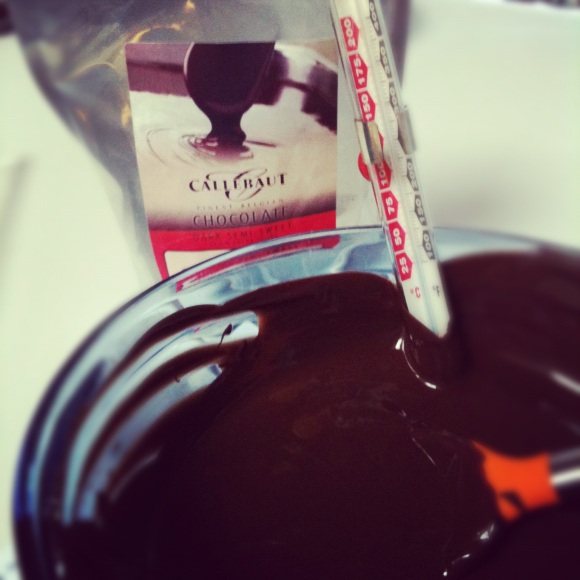
Callebaut Dark Semi Sweet Chocolate

I used a double boiler method with a glass bowl over hot water and followed the steps to temper the chocolate. In retrospect, I would have been more aware of the process because my one pound of melted chocolate suddenly became two as I tried to lower the temperature of the chocolate in the bowl by adding unmelted callets. With all that chocolate ready to go, I suddenly realized that it would have been a good idea to purchase more than one mold- it turns out it’s not like making cookies where once one batch is out of the oven another can go in, etc. There’s more time involved in each ‘batch’ as the chocolate cools.

I had prepared THE mold by washing it and allowing it to thoroughly dry, then brushing each cavity with a lovely pink luster dust.  Next I filled each with a healthy scoop of chocolate- again, a little too much chocolate.

Next time I would start with less, maybe even use a drizzle spoon, because the next step is to turn the mold over and shake the excess chocolate on to a sheet of wax paper or silicone mat, leaving a nice fill-able shell.

However, with too much excess my edges became a little messy, which affected the finished product and made my Bon Bons a little wobbly on their bottoms. Next came the filling. I had made a lovely Passion Fruit Ganache with fresh pulp I brought back from my Aunt’s garden in Hawaii- yummy!

I thought it would be a good idea to pipe it into the cooled shells, but once again, I over filled and so some of my Bon Bons were more like Bon Balls once I added a ‘cap’ of chocolate to seal in the filling. Here again, the edges were overflowing, so once the chocolate cooled and the Bon Bons popped out, their edges needed quite a bit of trimming. So really, temperance is just as important as the tempering!

I just used a super sharp knife blade to trim them up, and nestled each one into a pretty cupcake liner that I had turned inside out. I love how the luster dust shines on the top, in fact that would be the one thing I would use more of next time.

Into the boxes they go! Just right for gifting. Now the only question is what to do with the rest of that chocolate?….

Want to learn more about chocolate? Keep an eye on our Cooking School Schedule for the Chocolate Workshop, Fondue Family Fun and other delicious opportunities for your own adventures in and with CHOCOLATE!

Tagged ,